Have you ever been on a family outing, camera in hand, aiming to capture that perfect moment of your child sprinting across the park? Perhaps you clicked the shutter just as they leaped, but instead of nostalgia, you got a blurry mess that hardly evokes the joy of the moment. Having been in this situation countless times myself, I can assure you that capturing motion is an exhilarating endeavor with the right techniques in place. In this post, I’ll share the secrets I’ve learned over 25 years of experience in photography, especially in motion photography, to help you seize those beautiful strands of movement and emotion in every shot.
The Power of Motion in Photography
Have you ever looked at a photograph and felt the rush of energy it conveys? That’s the magic of motion in photography. Capturing motion breathes life into images. It transforms a still moment into a dynamic story. It’s like freezing a fleeting moment in time, allowing viewers to feel the energy and emotion behind it.
Why Capturing Motion Matters
When we capture motion, we’re not just taking a picture; we’re telling a story. Imagine a child running through a field, arms wide open, laughter echoing in the air. A still image of that moment might show a happy child, but a shot that captures the motion—perhaps with the grass flying up behind them—brings the scene to life. It invites the viewer to experience the joy, the freedom, and the sheer exuberance of that moment.
Motion photography is essential for several reasons:
- Energy and Life: It adds vibrancy to images.
- Emotion: It evokes feelings that still images often can’t.
- Storytelling: It tells a story that resonates with viewers.
Examples of Powerful Motion Shots Across Genres
Let’s explore some powerful examples of motion photography across various genres. Each showcases the beauty and impact of capturing movement.
- Sports Photography: Think of a soccer player mid-kick, muscles taut, the ball soaring through the air. The image captures not just the action but the anticipation of the crowd.
- Wildlife Photography: A cheetah sprinting at full speed. The blurred background emphasizes its incredible speed, making the viewer feel the rush of the chase.
- Event Photography: A dancer caught in mid-leap, hair flowing, and expression full of passion. The motion captures the essence of the performance.
These examples show how motion can elevate a photograph from ordinary to extraordinary. It’s about capturing that split second that tells a larger story.
The Role of Emotion in Dynamic Photography
Emotion plays a crucial role in dynamic photography. When we capture motion, we also capture feelings. A photo of a couple dancing can evoke joy, love, and connection. A child splashing in a puddle can bring out nostalgia and happiness. The key is to anticipate those moments and be ready to capture them.
As a photographer, I’ve learned that the best shots often come from being in the right place at the right time. It’s about observing and anticipating action. I remember a family shoot where the kids were playing tag. I could see the joy on their faces, the laughter in the air. I adjusted my settings quickly and captured a moment where one child was leaping over another. The image was filled with energy and emotion, and it became one of the family’s favorites.
So, how do we harness this power of motion? Here are a few tips:
- Be Patient: Wait for the right moment. Sometimes, the best shots come when you least expect them.
- Experiment: Try different shutter speeds to see how they affect the motion in your images.
- Practice: The more you shoot, the better you’ll get at anticipating action.
Incorporating motion into your photography can be a game-changer. It adds depth, emotion, and a sense of life to your images. So, the next time you’re out shooting, think about how you can capture not just the subject but the movement and emotion surrounding it. It’s these elements that will make your photos resonate with viewers and tell a compelling story.
2. Essential Shutter Speed Fundamentals
What is Shutter Speed?
Shutter speed is a crucial element in photography. It refers to the length of time your camera’s shutter is open, allowing light to hit the sensor. Think of it like a window: the longer you keep it open, the more light comes in. But here’s the catch—this also affects how motion appears in your photos.
When you use a fast shutter speed, say 1/1000th of a second, you freeze action. This is perfect for capturing that split-second moment of a child jumping or a dog leaping through the air. On the other hand, a slow shutter speed, like 1/30th of a second, can create a beautiful blur, showing movement and energy. It’s all about what you want to convey in your image.
Why Shutter Speed Matters
Understanding shutter speed is essential for any photographer. It allows us to control the mood and feel of our images. Want to capture the excitement of a soccer game? A fast shutter speed will do the trick. Looking to portray the serenity of a flowing waterfall? A slow shutter speed can create that dreamy effect.
“Ever tried to capture a fast-moving subject, only to end up with a blurry mess?”
That’s the reality many of us face. But mastering shutter speed can help avoid those frustrating moments. It’s about knowing when to freeze the action and when to let it flow.
Recommended Shutter Speed Ranges for Different Scenarios
Let’s break down some recommended shutter speed ranges based on what you’re shooting:
- Fast Shutter Speed (1/1000s – 1/4000s): Ideal for sports, wildlife, or any fast-moving subjects.
- Moderate Speeds (1/250s – 1/500s): Great for portraits with slight movement, like a child running.
- Slow Shutter Speed (1/30s – 1s+): Perfect for creating intentional blur, such as light trails or flowing water.
These ranges are not set in stone. They’re guidelines to help you get started. The key is to experiment and see what works best for your style and subject.
Balancing Shutter Speed with Lighting Conditions
Now, how do we balance shutter speed with lighting? This is where it gets a bit tricky. In low-light situations, you might want to use a slower shutter speed to allow more light in. But remember, this can lead to motion blur if your subject is moving.
Here’s a tip: if you’re in a dimly lit room and want to capture a moving subject, consider increasing your ISO. This makes your camera more sensitive to light, allowing you to use a faster shutter speed without sacrificing exposure. However, be cautious—higher ISO can introduce noise into your images.
On bright sunny days, you might find yourself needing faster shutter speeds to prevent overexposure. This is where ND filters come in handy. They reduce the amount of light entering the lens, allowing you to use slower shutter speeds even in bright conditions. It’s a game-changer for capturing motion blur in daylight.
Final Thoughts on Shutter Speed
Understanding shutter speed is like having a superpower in photography. It gives you the ability to control how motion is captured in your images. Whether you’re freezing a moment in time or creating a sense of movement, mastering this fundamental aspect will elevate your photography.
So next time you’re out shooting, think about your shutter speed. What story do you want to tell? How do you want to portray motion? With practice and experimentation, you’ll find the perfect balance that works for you.
3. Techniques to Freeze Action
Have you ever tried to capture a fast-moving subject, only to end up with a blurry mess? I know I have! It can be frustrating, especially when you know the moment was perfect. But don’t worry. With the right techniques, you can freeze action and create stunning images that pop with energy. Let’s dive into some essential methods to help you master this skill.
1. Start with Super-Fast Shutter Speeds
The first step to capturing crisp action shots is to use a fast shutter speed. Think about it: when a subject is moving quickly, a slow shutter speed will blur the image. To avoid this, I recommend starting at a shutter speed of 1/1000s or faster. This is especially crucial for sports, pets, or kids in motion. You want to freeze the action, right?
But what if you’re shooting in low light? You can adjust your ISO to compensate for the faster shutter speeds. Just remember, a higher ISO can introduce noise, so find a balance that works for your situation. It’s all about experimenting and finding what suits your style.
2. Utilizing Continuous Autofocus
Next up is continuous autofocus. This feature is a game-changer when it comes to tracking moving subjects. In photography, we often refer to this as AI-Servo or AF-C mode. It allows your camera to maintain focus on a subject as it moves, ensuring that your shots remain sharp. Imagine trying to photograph a soccer player sprinting down the field. If your focus isn’t locked in, you might miss the shot entirely!
Continuous autofocus is ideal for wildlife, sports, and event photography. It’s like having a personal assistant who keeps their eyes glued to the action. Trust me, once you get the hang of it, you’ll wonder how you ever shot without it!
3. Mastering Burst Mode
Now, let’s talk about burst mode, also known as continuous shooting. This feature allows you to capture multiple frames per second, which is perfect for action shots. When I’m at a fast-paced event, I often hold down the shutter button and let the camera do its thing. It’s like fishing with a net instead of a rod—you’re more likely to catch the perfect moment!
With burst mode, you can reduce the risk of missing that split-second action. Whether it’s a dog leaping through the air or a child taking their first steps, you’ll have a series of images to choose from. And trust me, one of those frames is bound to be a winner.
4. Positioning & Anticipation
While the technical aspects are crucial, positioning and anticipation play a significant role in capturing action shots. Stand at an angle where the motion moves into the frame for a stronger composition. Think about where the action will happen and pre-focus on that area. It’s like being a sports coach—anticipating the play before it unfolds.
For example, if you’re photographing a runner, position yourself at the finish line. You’ll capture the moment they cross it, full of emotion and energy. This technique can elevate your photography from ordinary to extraordinary.
5. Best Scenarios for Freezing Action
- Sports photography
- Wildlife photography
- Fast-moving subjects like running dogs or dancing
In my experience, these techniques shine in various scenarios. Whether you’re at a local soccer game or capturing your pet’s playful antics, freezing action can bring your images to life.
So, the next time you’re out shooting, remember these techniques: start with super-fast shutter speeds, utilize continuous autofocus, and master burst mode. With practice, you’ll be able to capture stunning action shots that tell a story and evoke emotion.
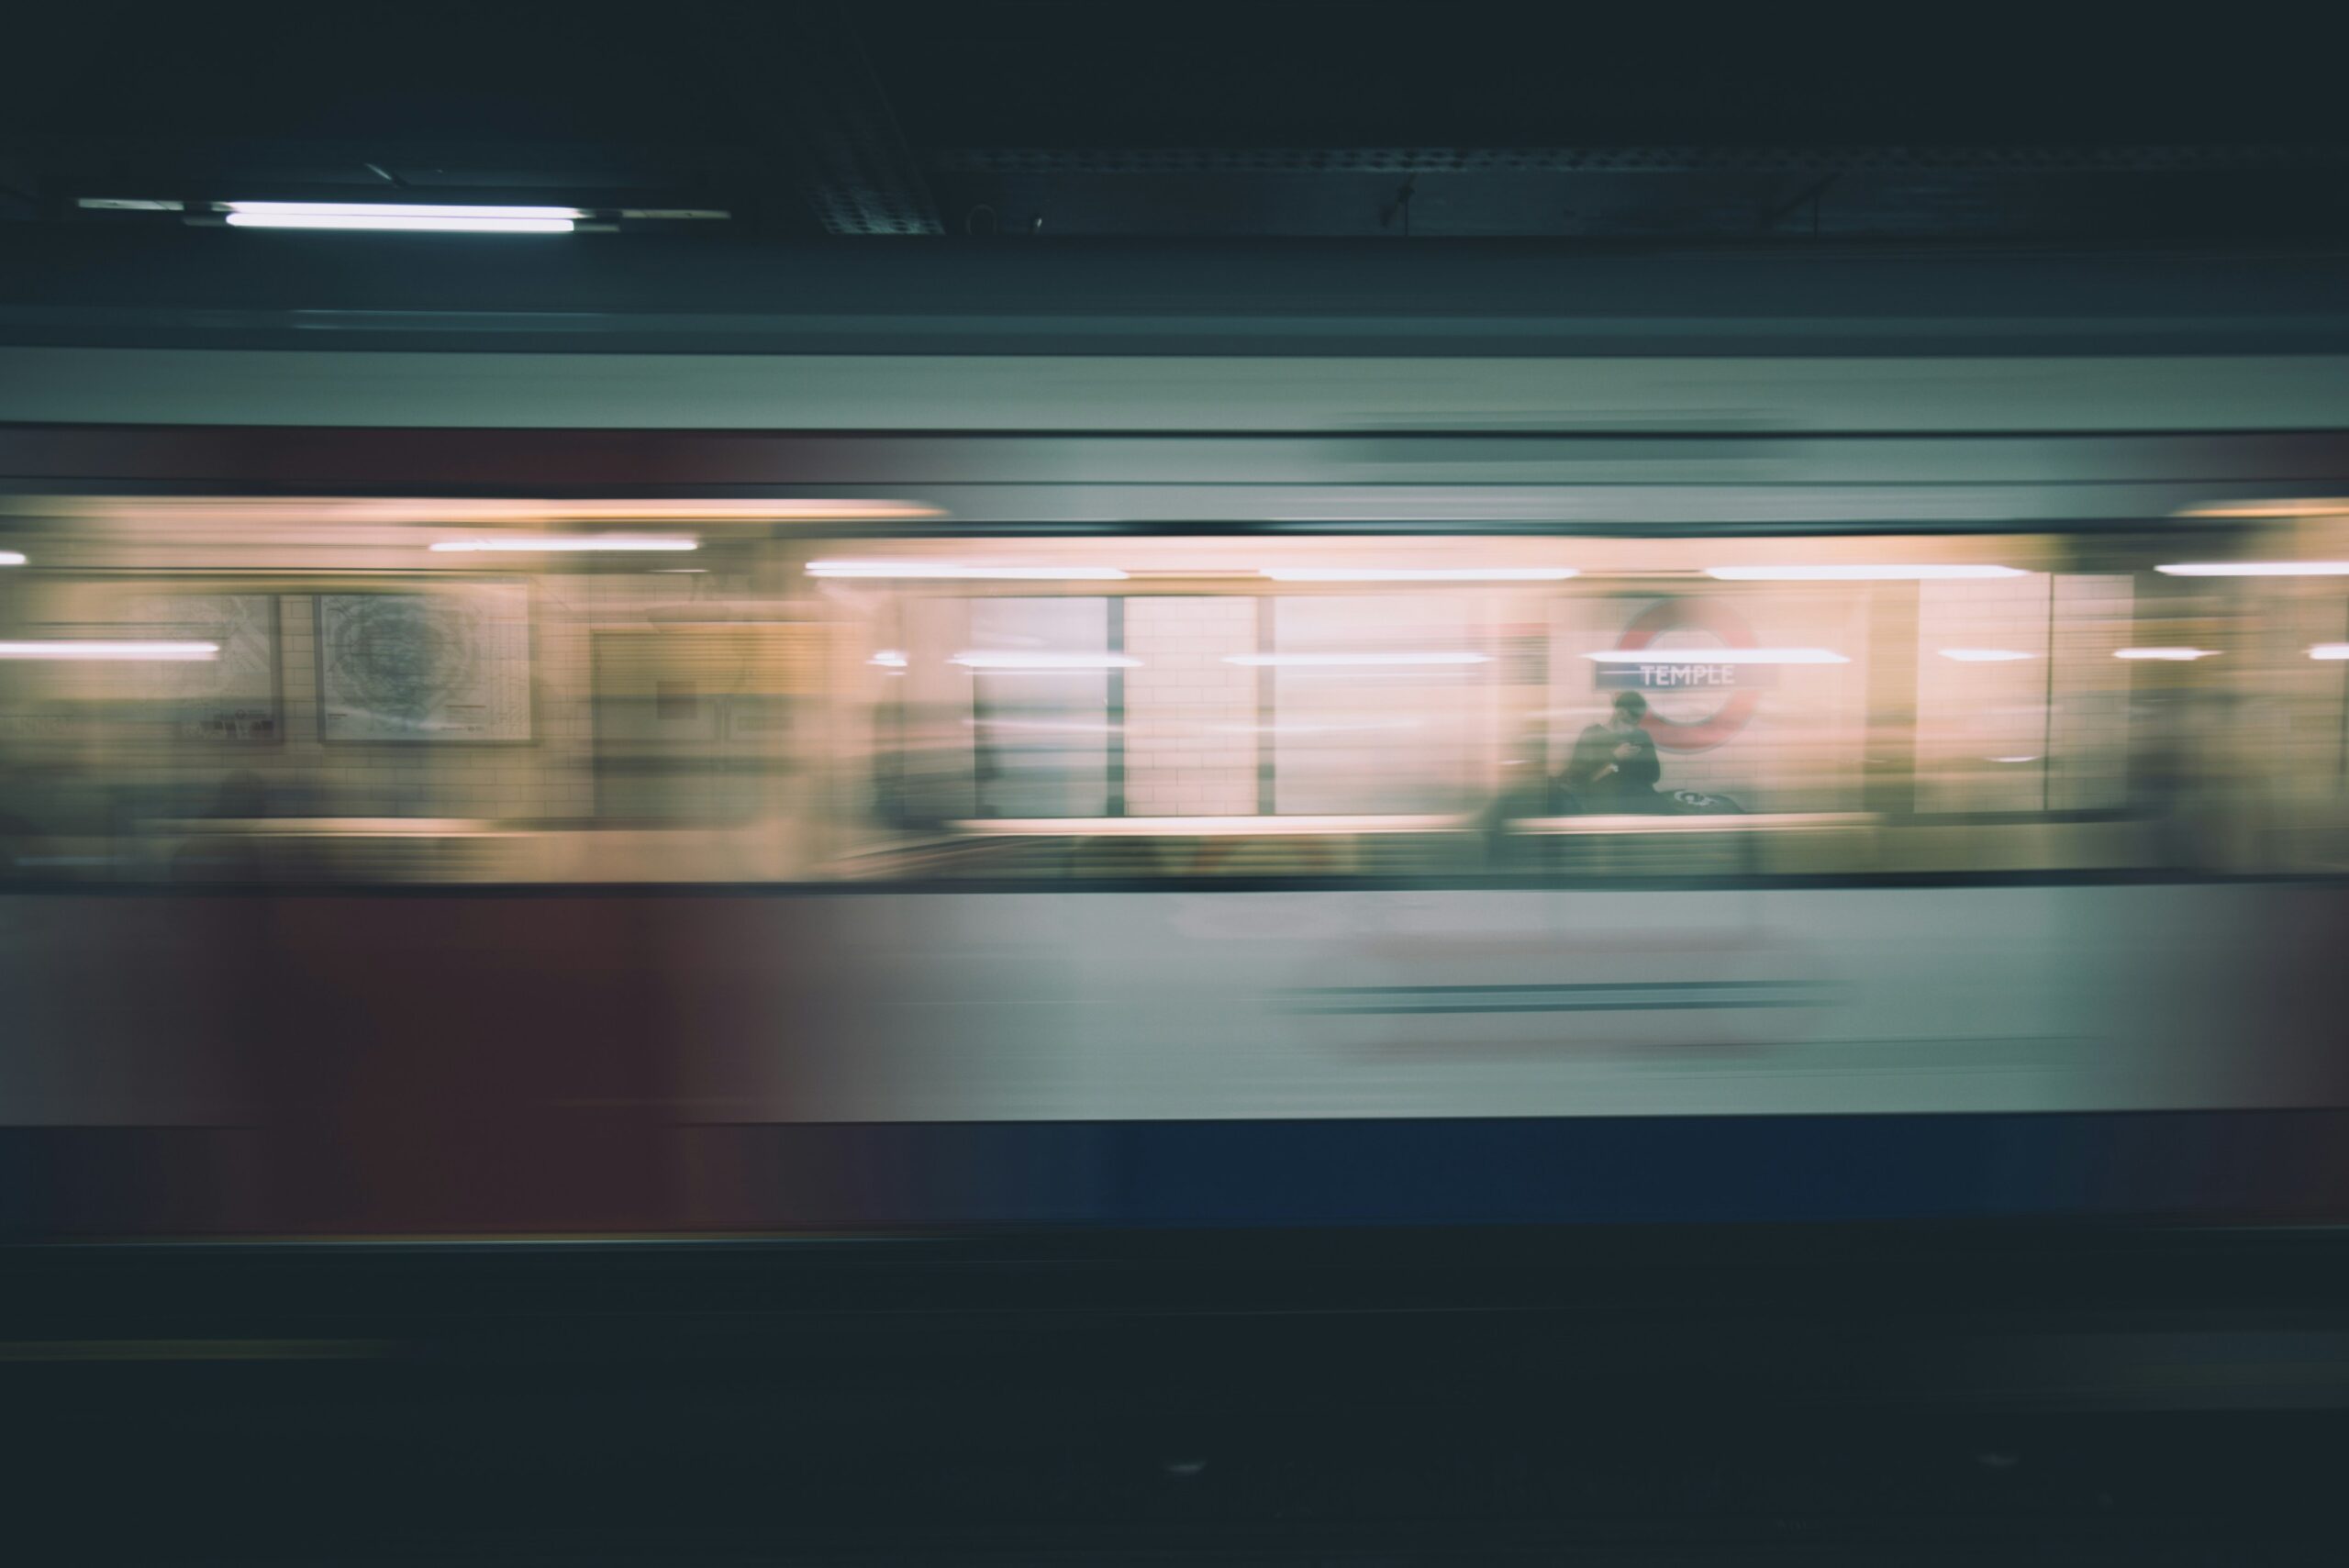
4. Unleashing Intentional Motion Blur
Have you ever watched a cyclist zoom past you, feeling the rush of wind and energy, and wished you could capture that moment? Or maybe you’ve seen stunning night shots of city streets, where the lights seem to dance? Well, let’s dive into the world of intentional motion blur. It’s not just about capturing a moment; it’s about telling a story through movement.
How to Execute Panning Techniques
Panning is one of my favorite techniques for showcasing motion. It’s all about moving your camera in sync with a moving subject. Think of it like a dance. You and your subject are partners, and you need to move together to create that beautiful blur effect.
- Start with the Right Shutter Speed: A shutter speed of around 1/30s to 1/60s is a good starting point. This allows enough time to capture the movement while keeping your subject sharp.
- Practice Your Timing: Anticipate the moment your subject enters the frame. It’s like waiting for the perfect wave when surfing. You want to be ready to catch it!
- Follow Through: As you press the shutter, continue moving the camera in the same direction as your subject. This smooth motion is key to achieving that desired effect.
One time, I was at a local cycling event, and I decided to try panning with my camera. I positioned myself at a corner where the cyclists would be speeding by. I took a deep breath, focused on one cyclist, and followed them as they whizzed past. The result? A stunning shot where the cyclist was crisp, while the background was a beautiful blur of color. It felt like I had captured the very essence of speed!
Creating Magical Light Trails During Night Shoots
Night photography opens up a whole new world of creative possibilities. One of the most enchanting techniques is capturing light trails. Imagine the vibrant streaks of car lights weaving through a cityscape. It’s like painting with light!
- Use a Tripod: Stability is crucial. A tripod will help you avoid unwanted camera shake during long exposures.
- Shutter Speed Matters: For light trails, you’ll want to use a shutter speed of several seconds—anywhere from 5 to 30 seconds works well. This allows enough time for the lights to create those beautiful streaks.
- Experiment with Locations: Find a spot with good traffic flow. Bridges or elevated viewpoints can provide stunning perspectives.
On one of my night shoots, I found a perfect overlook of a busy intersection. I set up my tripod, adjusted my settings, and waited. As the cars began to move, I pressed the shutter. The result was a mesmerizing image of vibrant light trails against the dark sky. It felt like I had captured the heartbeat of the city!
Tips for Achieving Smooth Bokeh with Movement
Bokeh is that dreamy, out-of-focus background that adds a magical touch to your photos. When combined with movement, it can create stunning effects. Here’s how to achieve that smooth bokeh while capturing motion:
- Use a Wide Aperture: Set your lens to a low f-stop (like f/2.8 or lower) to create that creamy bokeh effect.
- Incorporate Movement: Whether it’s a person walking or leaves swaying in the wind, include something moving in your frame. This adds life to your shot.
- Focus on Your Subject: Ensure your main subject is sharp while the background blurs beautifully. This contrast enhances the sense of motion.
During a family shoot in a park, I decided to try this technique. I had the kids run around while I shot at a wide aperture. The result? A delightful image where the children were sharp and the colorful autumn leaves blurred into a beautiful backdrop. It felt like capturing a moment in time, full of joy and movement!
Intentional motion blur is a powerful tool in photography. It allows us to convey energy, emotion, and a sense of life in our images. So, grab your camera, get out there, and start experimenting with these techniques. You might just find a new favorite way to capture the world around you!
5. Picking the Right Camera Settings
When it comes to capturing motion, the right camera settings can make all the difference. I remember my early days as a photographer, struggling to freeze a moment in time. It felt like every shot of my kids running around ended up as a blurry mess. Sound familiar? Let’s dive into how you can avoid that frustration and start capturing stunning action shots.
Understanding the Impact of ISO and Aperture on Motion
First, let’s talk about ISO and aperture. These two settings are crucial when photographing motion. Think of ISO as your camera’s sensitivity to light. A higher ISO allows you to shoot in lower light conditions, but it can introduce noise. So, if you’re shooting a fast-moving subject in a dimly lit area, you might need to increase your ISO. But beware—too high, and your image might look grainy.
Now, let’s move on to aperture. This setting controls how much light enters your camera and affects the depth of field. A wider aperture (like f/2.8) lets in more light and creates a beautiful background blur, making your subject pop. But if you’re trying to capture a group of kids playing, a narrower aperture (like f/8) will keep more of the scene in focus. It’s all about balance.
So, how do these settings impact motion? Well, a faster shutter speed is essential for freezing action. But to achieve that, you might need to adjust your ISO and aperture accordingly. It’s a bit of a juggling act, but once you get the hang of it, it becomes second nature.
Using Shutter Priority Mode for Simplified Shooting
If you’re feeling overwhelmed by all these settings, don’t worry! There’s a handy mode called Shutter Priority (often labeled as Tv or S on your camera). This mode allows you to set the shutter speed while your camera automatically adjusts the aperture for optimal exposure. It’s a lifesaver, especially when you’re trying to capture fast-moving subjects like sports or pets.
For instance, when I photograph my dog running in the park, I switch to Shutter Priority mode and set the shutter speed to 1/1000s. This ensures I freeze the action without worrying about the other settings. It’s like having a co-pilot in your photography journey!
Tips to Maintain Focus Accuracy While Tracking Movement
Now, let’s tackle focus accuracy. Tracking a moving subject can be tricky, but with a few tips, you’ll be nailing those shots in no time. First, use Continuous Autofocus (often labeled AI-Servo or AF-C). This mode allows your camera to track moving subjects, adjusting focus as they move. It’s a game-changer for action photography.
Another tip is to increase your focus points. Most cameras allow you to select multiple focus points, which can help you maintain focus on a moving subject. I often find myself pre-focusing on an area where I anticipate the action will happen. It’s all about being one step ahead!
Lastly, practice makes perfect. The more you shoot, the better you’ll get at anticipating movement and keeping your subjects in focus. Don’t be afraid to experiment with different settings and techniques. It’s all part of the learning process.
In summary, mastering the right camera settings for motion photography takes time and practice. By understanding the impact of ISO and aperture, utilizing Shutter Priority mode, and honing your focus accuracy, you’ll be well on your way to capturing stunning action shots. So grab your camera, head outside, and start experimenting! You might just surprise yourself with what you can create.
6. Recommended Gear for Motion Photography
When it comes to capturing motion, having the right gear can make all the difference. I’ve spent years experimenting with various tools, and I can tell you that the right equipment not only enhances your creativity but also boosts your confidence in shooting dynamic scenes. Let’s dive into some essential gear that every motion photographer should consider.
The Importance of a Fast Lens for Low-Light Shots
First off, let’s talk about lenses. A fast lens is crucial for low-light situations. What do I mean by “fast”? It refers to a lens with a wide aperture, typically f/2.8 or lower. This allows more light to hit the sensor, which is essential when you’re trying to freeze action in dim conditions.
Imagine you’re at a twilight soccer game. The sun is setting, and the lights haven’t fully kicked in yet. You want to capture that exhilarating moment when a player scores a goal. If you’re using a lens with a narrow aperture, you’ll struggle to get a clear shot without cranking up your ISO, which can introduce noise. A fast lens lets you shoot at a lower ISO, resulting in cleaner images. It’s like having a secret weapon in your photography arsenal!
Recommended Tripods and Monopods for Stability
Next up, let’s discuss stability. Whether you’re shooting a long exposure of a waterfall or capturing a fast-moving athlete, stability is key. This is where tripods and monopods come into play.
- Tripods: These are fantastic for long exposures. They keep your camera steady, allowing you to use slower shutter speeds without introducing blur. I remember a time when I was shooting light trails from cars at night. My tripod was a lifesaver, enabling me to capture those beautiful streaks of light without any shake.
- Monopods: On the other hand, if you’re in a fast-paced environment, like a sports event, a monopod offers flexibility. It’s easier to maneuver than a tripod, allowing you to follow the action while still providing some stability. I often use a monopod when photographing wildlife; it gives me the best of both worlds.
Choosing the Right Filters for Creative Effects
Now, let’s get creative! Filters can add an artistic touch to your motion photography. One of my favorites is the Neutral Density (ND) filter. This filter reduces the amount of light entering the lens, allowing you to use slower shutter speeds even in bright conditions. It’s perfect for creating that dreamy motion blur in waterfalls or capturing the smooth flow of a busy street.
Think of it this way: without an ND filter, shooting in bright sunlight might force you to use a fast shutter speed, which defeats the purpose of showcasing motion. With the ND filter, you can slow down your shutter speed, creating a beautiful contrast between the moving elements and the static background.
Another filter to consider is a polarizing filter. It can enhance colors and reduce reflections, making your images pop. I’ve used it while shooting landscapes with moving clouds, and the results were stunning!
In summary, having the right gear is essential for capturing motion effectively. A fast lens allows you to shoot in low light, while tripods and monopods provide the stability you need for sharp images. And don’t forget about filters; they can elevate your creative vision. So, what are you waiting for? Equip yourself with these tools and start capturing the beauty of motion!
Avoiding Common Mistakes in Motion Photography
When it comes to motion photography, we all want to capture that perfect shot. But sometimes, our images don’t turn out as we hoped. Have you ever taken a photo of a moving subject only to find it’s a blurry mess? Or perhaps you’ve tried to create a stunning light trail, but it just didn’t have the impact you envisioned? Don’t worry; you’re not alone. Let’s dive into some common mistakes and how to avoid them.
1. Identifying and Rectifying Blur Caused by Improper Settings
Blur can be a photographer’s worst enemy. It often happens when the shutter speed is too slow for the motion you’re trying to capture. For instance, if you’re photographing a child running, using a shutter speed of 1/30s might result in a blurry image. Instead, try starting at 1/1000s or faster. This will freeze the action and give you a crisp shot.
But what if you’ve already taken the shot and it’s blurry? The first step is to check your settings. If your shutter speed is too slow, adjust it. If you’re in low light, increase your ISO. Remember, a higher ISO can introduce noise, but it’s better than a blurry photo.
Also, consider your autofocus settings. Using continuous autofocus (AI-Servo or AF-C mode) can help track moving subjects more effectively. I remember a time when I missed a perfect shot of my dog leaping into the air because my focus was set to single-shot mode. Lesson learned!
2. Understanding Why Background Blur Can Disrupt Panning Shots
Have you ever tried panning your camera to follow a moving subject, only to find the background is too sharp? This can disrupt the sense of motion you’re trying to convey. Panning is all about creating a dynamic shot where the subject is in focus, but the background is blurred, giving the viewer a sense of speed.
To achieve this, you need to use a slower shutter speed—typically around 1/30s to 1/60s. As you move your camera with the subject, it’s crucial to keep your movements smooth and steady. If the background is too sharp, it can distract from the subject and make the photo feel static.
Think of it this way: when you’re driving and you see a car zoom past, the background blurs, right? That’s the effect you want to replicate in your photos. If you find your background is still too sharp, try slowing down your shutter speed even more and practice your panning technique. It takes time, but the results are worth it!
3. Solutions for Enhancing Light Trails in Low-Visibility Conditions
Capturing light trails can be magical, especially at night. But what happens when you’re in low-visibility conditions? The key is to use a longer exposure time—typically between 5 to 30 seconds. This allows the camera to gather enough light to create those beautiful trails.
However, a longer exposure can also lead to unwanted blur in stationary elements. To prevent this, use a tripod to stabilize your camera. I’ve made the mistake of trying to shoot light trails without one, and the results were disappointing. The camera shake ruined the shot.
Additionally, consider using an ND filter. This allows you to slow down your shutter speed without overexposing the image, even in bright conditions. It’s a game-changer for capturing those stunning light trails while maintaining clarity in your shots.
In conclusion, avoiding these common mistakes in motion photography can elevate your skills significantly. By adjusting your settings, understanding the dynamics of panning, and mastering light trails, you’ll be well on your way to capturing stunning motion shots. Remember, practice makes perfect, and every mistake is a step toward improvement!
8. Conclusion: Let Your Passion Drive Your Photography
As I wrap up this journey through the world of motion photography, I want to take a moment to reflect on the essence of what we’ve discussed. Photography is not just about capturing images; it’s about capturing moments, emotions, and stories. It’s about letting your passion drive your creativity. So, how do we do that?
Encouragement to Practice and Explore
First and foremost, I encourage you to practice. Experiment with the techniques we’ve talked about. Whether it’s freezing a moment in time or showcasing motion through blur, the key is to get out there and try. Remember, every great photographer started somewhere. I certainly did. I recall my early days, fumbling with settings and missing shots. But each mistake was a lesson learned. Each click of the shutter brought me closer to understanding my craft.
Have you ever felt that rush when you finally capture the shot you envisioned? It’s exhilarating! That’s the magic of photography. So, don’t shy away from the challenges. Embrace them. Explore different settings, different subjects, and different techniques. The more you practice, the more you’ll grow. And trust me, the growth you’ll experience will be worth it.
Reflecting on My Journey
Reflecting on my own journey, I can see how far I’ve come. From the days of using film to now, with digital technology at my fingertips, the evolution has been incredible. I remember the first time I captured a moving subject with clarity. It was a simple shot of my dog running through the park. But the joy I felt in that moment was profound. It was then I realized that photography is a personal expression. It’s about capturing what you love, what moves you, and sharing that with the world.
Each photo I take tells a story. Whether it’s a family portrait, a newborn’s first moments, or a pet’s playful antics, I pour my heart into every shot. This is what I want for you too. Find what moves you. Let that passion guide your photography. It’s not just about the technical skills; it’s about the feelings behind the lens.
Photography as Personal Expression
Finally, I invite you to view photography as a personal expression. It’s your unique perspective that will set your work apart. Think about what you want to convey through your images. Is it joy? Movement? Stillness? Whatever it is, let it shine through. Don’t be afraid to share your vision with others. Your voice matters, and your perspective is valuable.
Remember, photography is a journey, not a destination. There will always be more to learn, more to explore, and more to create. So, keep your camera close, and let your passion drive you. Capture the world as you see it, and don’t forget to enjoy the process along the way. After all, it’s not just about the final image; it’s about the moments you experience while creating it.
So, go out there, experiment, and let your passion for photography flourish. I can’t wait to see the incredible images you’ll create!
TL;DR: Unlock the secrets of motion photography with essential techniques and tips—from freezing action to showcasing dynamic movement—ensuring your photos are as lively as the moments you capture.